Water is essential to life, so when camping or travelling through wilderness areas, knowing how to purify water in the outdoor is crucial. There are multiple methods available; choosing one depends on your resources.
One of the critical skills required when hiking or camping in remote wilderness locations is learning how to purify water for drinking purposes. There are multiple techniques for doing this effectively, but what matters most is ensuring the drinking water you rely on contains no harmful bacteria and viruses that might compromise its purity.
Water purification should always come before drinking it for your wellbeing and to reduce illness on hiking or camping excursions. By doing so, purifying can ensure you remain adequately hydrated on every journey or expedition.
Table Of Contents
- 1 Finding Water Sources in the Wild:
- 2 Why drinking salt water is bad?
- 3 Types of Water Purification In Outdoors
- 4 How to Purify Water In the Outdoor?
- 5 Best Backpacking Water Filters
- 6 How To Assemble A Water Bottle Survival Kit: Step By Step Guide
- 7 How To Prevent Dehydration While On Outdoor?
- 8 Conclusion
Finding Water Sources in the Wild:

Locating fresh drinking water outdoors is vital to survival, with various methods depending on where you’re exploring and your environment. Below are a few ideas of ways you might discover an oasis.
- Search for Moving Water: One way of finding water in the wild is to look for flowing rivers, streams or waterfalls, as these tend to contain clean drinking water compared to stagnant bodies of water over time.
- Scout for Signs of Animal Life: Another strategy for finding water can be seen by searching out evidence of animal life, such as deer, birds or squirrels – these animals require water to thrive! By tracking them down, it will likely uncover hidden water sources nearby. Look out for deer, birds and squirrels for guidance when searching.
- Search For Plants: Just like people need water sources nearby to survive, plants do too, making spotting one even easier! Look out for any lush areas containing green or lush areas; these may hold hidden sources of freshwater nearby.
- Listen for Running Water: If you can’t spot any sources, listen out for running water over rocks; this sound will indicate nearby water sources.
- Digger: If you live in an area with sandy soil, digging may help you discover water. Dig a six to eight foot-deep hole and wait for moisture seepage; when this has taken place, use its contents for drinking or cooking purposes.
Finding water in the wild is critical to survival; these methods will help you locate it quickly and reliably. Stay hydrated by following them today.
Why drinking salt water is bad?
Though salt water might appear like the perfect beverage to help rehydrate on an island, drinking too much will only lead to further dehydration – potentially even death!
Saltwater cannot provide your body with adequate hydration; when consumed, it draws fluid out of cells into the bloodstream to dilute salt content; this not only doesn’t hydrate you properly but can even lead to dehydration and even death!
If you find yourself forced to drink from rivers or oceans, make sure that filtration occurs first – as we discussed our outdoor purification methods of water.
Types of Water Purification In Outdoors
- Boiling mes
- Boiling Solar Disinfection
- Chlorine Dioxide Tablets
- Iodine
- Sawyer mini Water filter mes
- Lifestraw
- Water bottle with UV purifier
How to Purify Water In the Outdoor?
1. Boiling Water Till It can be Drinkable
In an emergency without access to clean drinking water, boiling is one of the best purification methods. All that’s required for boiling is a heat source and a container for holding the boiling liquid.
First, bring water to a rolling boil for one minute; this should kill most bacteria and viruses. Let it cool slightly before pouring it into an appropriate container for storage.
Now your water should be safe to consume when finished.
2. Solar Disinfection To Kill Harmful Bacterias
One practical and straightforward way of purifying water when camping outdoors is using the sun as your source. Solar disinfection, sometimes referred to as sodas utilizes ultraviolet radiation from the sun’s ultraviolet rays to kill off harmful bacteria, viruses and contaminants which might otherwise exist within your water source.
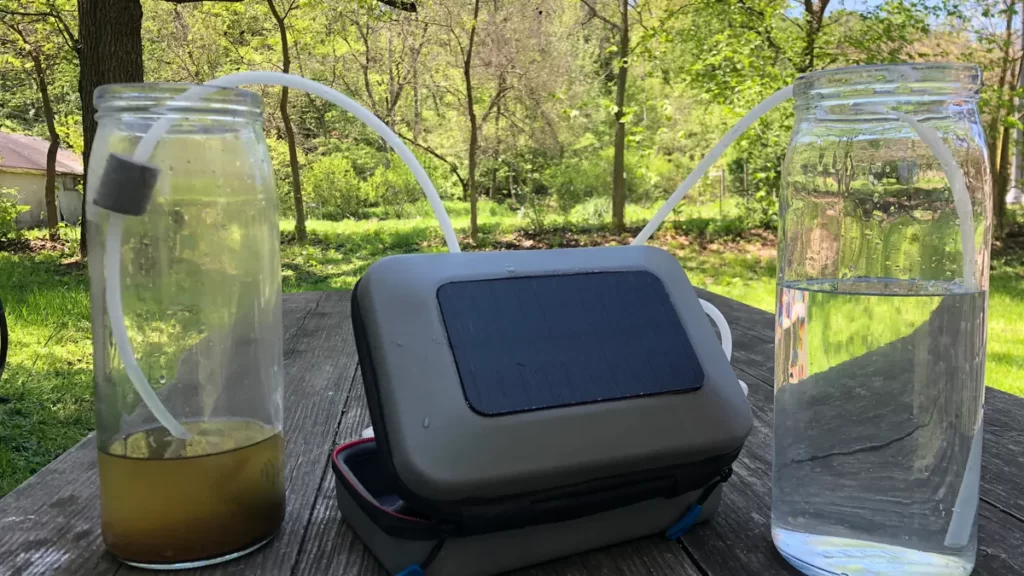
Sunlight’s UV rays can be an immensely powerful weapon against pathogens; solar disinfection has long been employed as an efficient means of purifying water supplies in developing nations with limited access to clean drinking water sources.
Solar disinfection can quickly purify water using only one clear plastic bottle and 6hrs in direct sunlight. The longer your bottle sits in direct sunlight, the greater its effectiveness as a disinfectant.
After 6 hours, your water should be safe to consume; if desired, let it sit post-disinfection to allow residual chlorine to dissipate further.
Solar disinfection can be an easy, affordable, and straightforward method for purifying water. At the same time, hiking or camping – be sure to try it next time you need clean drinking water while out and about!
3. Try Using Chlorine Dioxide Tablets
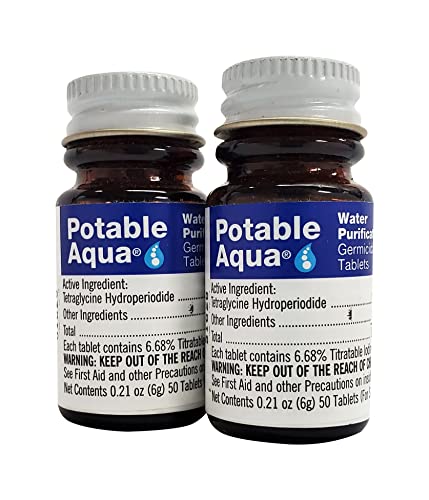
- Two Bottles Of 50 Count Potable Aqua Water Purification Tablets
- Water Treatment Tablets, Providing Water Purification For Camping, Hiking, Traveling And Emergency Water Preparedness Situations
- Potable Aqua Emergency Water Purification Tablets For Drinking Water Are Effective Against Giardia Lamblia When Used As Directed
- Water Purification Tablets Make Questionable Water Bacteriologically Suitable To Drink, Even In Emergency Water Purification Situations.

A water purification tablet should always be included in any survival or emergency kit; these lightweight pills can easily fit in your bag while protecting you in water-related emergencies.
Chlorine dioxide tablets are an economical and effective means of water purification, typically utilized in clear waters to treat them and kill harmful organisms and viruses such as E. Coli. Unfortunately, chlorine dioxide tablets don’t remove dirt sediments or particulate matter accumulating in water sources such as lakes.
Simply follow the directions on their package to use chlorine dioxide tablets effectively and purify water efficiently. There are two primary approaches for using them to purify it:
- By dissolving them in specific amounts of water;
- Placing one directly in your bottle/container so you can take in purified water as you drink from it.
Chlorine dioxide tablets provide reliable and straightforward water purification solutions and should be included in any survival or emergency kit.
4. Iodine
Iodine is one of the easiest, cheapest, and most straightforward water purification solutions today – affordable, portable, and user-friendly, all rolled into one. All you need for iodine purification is a small bottle containing either crystals or tincture, plus some way to measure its concentration levels.
One of the great features of iodine is that it works on almost every water source imaginable. Be it clean spring water or murky lake water, rendering it safe to drink and for consumption. Though ideally, using only the cleanest source possible for purification should still be your goal.
To use iodine for water purification,
- Add between 0.5 to 2 drops per litre into an uncontaminated container
- Please leave it to sit for at least 30 minutes or up to an hour to work its magic.
- If water is particularly cold or has very hard minerals present, longer may be required before seeing results from using this technique.
- If using Iodine Crystals instead, add 8-10 Granules per Liter of water before leaving it to sit for at least 30 Minutes before drinking the solution.
Iodine water purification solutions may provide effective results, but they can have drawbacks.
- First and foremost, drinking iodine-purified water might lead to strange tastes;
- some individuals also may experience stomach aches from this water purification method.
- If this concerns you, try leaving the solution to sit longer before drinking or adding salt as necessary to the mix.
As well, iodine alone cannot protect against viruses in water; to address that threat, you’ll require another purification method in addition to using iodine for purifying purposes.
5. Sawyer Mini Water Filter

- MAKE SAFE DRINKING WATER from virtually any freshwater source globally. Ultimate performance, portability, and convenience. Ideal for backpacking, hiking, outdoor recreation, and global travel.
- FAST & EASY TO USE: Fill. Press. Drink! - ‘Fill’ from any sketchy freshwater source; ‘Press’ on a low surface (e.g. ground), then ‘Drink’ clean, safe water anywhere
- REMOVES WATERBORNE PATHOGENS: 99.9% of viruses (e.g. rotavirus, norovirus, hepatitis A), 99.9999% of bacteria (e.g. E. Coli, salmonella, dysentery), and 99.9% of protozoan cysts (e.g. giardia, cryptosporidium, amoebae)
- FILTERS out particulates (including microplastics), many chemicals and heavy metals; Improves water taste, smell, and clarity
A Sawyer mini water filter can provide clean and safe drinking water while out in the wilderness;
here are five easy steps on how to use one:
- Collect water from natural sources such as lakes or rivers into your provided bag of filtered water,
- Screw on and secure a mini water filter
- Place it in your mouth while sucking up through the filter
- And then spit it back out for safe consumption.
- Repeat Steps 1-4 as necessary to collect more water.
Filtering water through the Sawyer mini water filter is effortless, even in remote places like wilderness environments, yet still very effective, capable of eliminating 99.99999% of bacteria and protozoa from sources.
So if you need a reliable yet easy-to-use filter for outdoor adventure, consider purchasing one like the Sawyer mini filter today!
6. Try Lifestraw

- Removes Bacteria & Parasites: The Microfiltration Membrane Removes 99.999999% Of Waterborne Bacteria (Including E. Coli And Salmonella), And 99.999% Of Waterborne Parasites (Including Giardia And Cryptosporidium)
- Removes Microplastics: Removes The Smallest Microplastics Found In The Environment (Down To 1 Micron), And Reduces Turbidity Down To 0.2 Microns
- Rigorous Testing: All Claims Are Verified With Laboratories Using Standard Testing Protocols Set By The Us Epa, Nsf, Astm For Water Purifiers
- Long Lifetime: The Microbiological Filter Will Provide 4,000 Liters (1,000 Gallons) Of Clean And Safe Drinking Water With Proper Use And Maintenance
Lifestraw is an emergency water filter for emergencies when clean drinking water is unavailable, such as during natural disasters or power outages. As its name implies, its straw-shaped filter can easily fit into streams and lakes to remove harmful bacteria and contaminants, such as oil, from streams that run off them.
To use the Lifestraw, insert its narrow end into any water source and suction up through it until full of liquid. Water will pass through it before being filtered by Lifestraw’s Hollow Fiber Membrane technology which uses tiny pores to trap contaminants such as bacteria and protozoa while still permitting clean water.
Lifestraw filters can purify up to 1,000 litres (264 gallons), making them a vital asset in emergencies.
7. Water Bottle with UV Purifier

Water bottles equipped with ultraviolet purification systems provide an efficient means for purifying water while outdoors, and here are a few pointers on how best to utilize one:
- Fill your water bottle from an environmentally-friendly source such as a stream or lake.
- Leave the water bottle exposed to direct sunlight for at least six hours for best results.
- After six hours, UV rays from the sun will completely purify your water supply.
- Now, you can rest easy knowing your water has been purified before drinking it!
- Before using a water bottle with a UV purifier for the first time, it’s wise to clean and rinse it out before placing it in sunlight for drying. Simply run water through it before leaving it in direct sunlight until it completely dries out.
- Once your water bottle with UV purifier has been used for an extended period, it must be cleaned again to reduce bacteria build-up and keep its condition optimal. Doing this regularly will extend its usefulness for years ahead.
- To effectively clean a water bottle, rinse it with warm water before leaving it in the sun to dry.
Best Backpacking Water Filters
If the above list is bit complex for you, you can try these Best Backpacking Water Filters from Amazon with great reviews and features you can find.

- Lightweight, easy to use portable water filter removes harmful bacteria, protozoa, cysts, sediment, And 100% of microplastics; Perfect for outdoor adventures, travel, or emergency preparedness
- High-Performance 0.1 micron absolute inline filter fits in the palm of your hand and weighs just 2 ounces
- 100% of squeeze units individually tested three times to performance standards by sawyer
- Removable cap; Filter water straight Into mouth or bottle from included pouch; Also fits standard water bottles with 28 mm threads; Use in gravity system

- HIGH-PERFORMANCE FILTER: The BeFree's 0.1 micron hollow fiber microfilter is tested to protect against harmful organisms, removing bacteria (99.9999% Klebsiella terrigena) and protozoan cysts (99.9% Giardia and Cryptosporidium) to EPA standards.
- ULTRALIGHT & COMPACT: Ultralight at just 2.3 oz. (63 grams) The collapsible Hydrapak Soft-Flask allows for portability in tight spaces like running short, cycling jersey, and vest pockets. Perfect for ultralight hikers, trail runners, and backpackers.
- EASY TO CLEAN: The Stay Clean drink nozzle protects against dirt, debris, and bacteria between uses. Simply shake or swish the EZ-Clean Membrane filter in water to remove debris. No backflushing or tools required.
- FAST OUTPUT: Free Flow Channels create a strong flow rate at 2 liters per minute. Suitable for use by 1-2 people.
- Removes Bacteria & Parasites: The Microfiltration Membrane Removes 99.999999% Of Waterborne Bacteria (Including E. Coli And Salmonella), And 99.999% Of Waterborne Parasites (Including Giardia And Cryptosporidium)
- Removes Microplastics: Removes The Smallest Microplastics Found In The Environment (Down To 1 Micron), And Reduces Turbidity Down To 0.2 Microns
- Rigorous Testing: All Claims Are Verified With Laboratories Using Standard Testing Protocols Set By The Us Epa, Nsf, Astm For Water Purifiers
- Long Lifetime: The Microbiological Filter Will Provide 4,000 Liters (1,000 Gallons) Of Clean And Safe Drinking Water With Proper Use And Maintenance

- CAMPING, BACKPACKING & SURVIVAL WATER FILTER: AntiClogTM, 0.2-micron glass fiber filter reliably removes 99.9999% of bacteria, 99.9% of protozoa, cysts, algae, spores, and sediments from clear to muddy water. An active carbon core reduces unpleasant tastes and odors.
- EASY TO CLEAN IN THE FIELD: Unlike other water filter systems, the Hiker Pro can be cleaned while camping, backpacking, hiking, or for survival in an emergency. Simply remove the filter from the body and swish in clear water to avoid clogging and ensure a consistent output.
- NAMED EASIEST TO USE BY US RETAILERS: The comfortable, ergonomic handle allows you to filter more water with less effort. Also comes with quick-connect hoses and a bottle adaptor makes for easy connection to most water bottles and hydration bladders.
- FAST FLOW RATE: The large filter surface of 271 cm2 (107 square inches), enables a flow rate of 1L per minute, with approximately ~48 pumps. Filters an average of 300 gallons before needing a replacement. Ideal for use by 1-2 people.
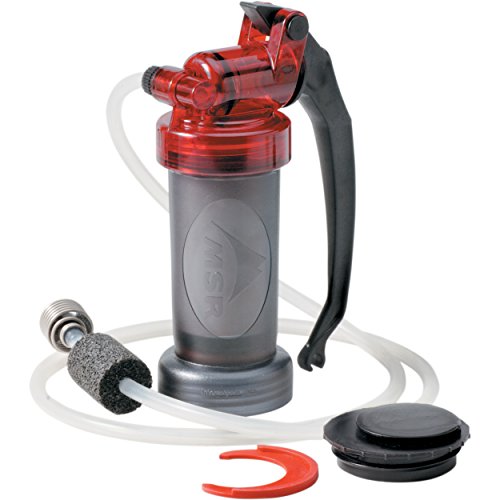
- Microfilter water filter pump for hiking, backpacking, camping, travel, survival, and emergency preparedness
- Replaceable carbon and ceramic filter removes bacteria, protozoa, organic compounds, and particulate, delivering clean, taste and odor-free water
- Pumps at a rate of one liter per minute; compatible with a variety of wide mouth water bottles, and hydration bladders (sold separately)
- Meets NSF protocol P231 for removal of bacteria (99.9999%) and protozoa (99.9%); one replaceable filter cartridge treats up to 2,000 liters of water

- Compact And Easy To Use - Weighing 12.8oz, this is a light and compact backpacking water filter. A water filtration system survival, hiking, camping and backpacking approved.
- Water Filter Backpacking - An easy pack-and-go water filter. No need to charge or wait for clean water with this hiking water filter. Comes with a cup, bag, filters, tubes, and instruction manual.
- Super Fast Flow Rate - This survival water filter has a fast flow rate of 500ml (17oz) per minute. Use directly from any fresh water source while on-the-go.
- Testing Standards - A BPA free water filter for camping. It removes 99.999% of tested Virus, Staph, Bacteria and Protozoa and reduces heavy metals according to NSF/ANSI Standards.

- Freedom to Drink, Anytime, Anywhere: Perfect companion on camping trips, hike, trail runs, biking tours, fishing trips, and more! Enjoy safe drinking water in anywhere, anytime! The Katadyn Hiker water filter includes a carry sack and bottle adapter that fits most water bottles. The easy Fill Bottle Adaptor attaches directly to a drinking bottle
- Superior Filtration: Removes particles, protozoa, and bacteria down to 0.2 microns (.002mm), including giardia, salmonella, and cryptosporidia. Glass-fiber element is pleated for increased surface area to handle silt and muddy water
- Quick and Efficient Aproximately 48 strokes per min. provide 1 liter of clean drinking water.
- Great Taste Every Time: Activated carbon in the core of the filter improves the taste and reduces chemicals in your drinking water.
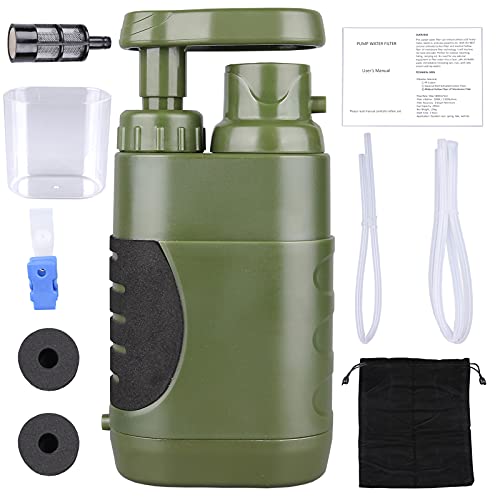
- High-efficiency water purifier: Portable Hand Pump Water Filter's maximum filtration capacity can reach 100,000 gallons, the ultra-fast flow rate of 1400ml/min, and the food-grade plastic transparent cup is included, which is very suitable for family/multiple people to drink or cook when they are outdoors.
- Effective water filter: The camping water filter survival uses a 3-stage filtration system (high-quality activated carbon fiber-coconut shell activated carbon rod-high-performance medical grade hollow fiber ultrafiltration membrane), with a filtration accuracy of 0.01μm, which can effectively remove 99.9999% of harmful substances and sediments.
- Practicability: The backpacking water filter is equipped with an advanced heavy-duty pre-filter, which can effectively isolate sand and reduce clogging; equipped with 2 large buoys, which can prevent the hose from kinking and reduce the difficulty of pumping; the equipped hose clamp can fix the hose, even if it is operated by one person, it is very convenient.
- High-quality materials: The camping water purifier is made of food-grade ABS plastic, with non-slip rubber added to the side and bottom, which is ergonomic and comfortable to use; the handle is thickened to avoid the handle breaking; 2 hoses (15.7/31.5 inches), very convenient for pumping water;comes with a compass to save space in your backpack.

- ✔️Innovative Ultrafiltration Technology: The outdoor pump water filter system use 0.01 micron hollow fiber ultrafiltration membrane, can reduce up to 99.9999% of tiny material. Consist of high quality coconut activated carbon fiber, effectively reducing odor from the nature water, health drinking guarantee even in the wild!
- ✔️High Efficiency Advanced 4-Stages Filtering System: 1. High-performance medical Grade Hollow Fiber UF Membrane, 2. High Quality Activated Carbon Fiber, 3. Coconut Shell Activated Carbon Rod, 4.Medical Grade PP Cotton. It's portable which makes it the perfect solution of water shortage in an emergency, and can instantly turn a water source nearby into healthy drinking water. Must for traveling, backpacking, camping and emergency kits!
- ✔️Super Fast Flow Rate And Fully Compact: Super-fast flow rate of up to max 1400 ml (58 Oz.) per minute; The water filter pump hiking can filter up to 793 Gallons(3,000 L) before replacement of its reusable carbon filter is required. Tips: the Lifespan of the repalcement filter depends on the quality of the water, try to use clean water to extend the Lifespan. One unit of Purewell Water Purified Pump can be used by several persons at the same time.
- ✔️Ergonomic design: Special rubber on sides and bottom of pump helps maintain a firm and sturdy surface while pump is in use, as well as increasing durability. The shell is made of food-grade materials. Upgrade handle diameter up to 15mm, never break. The transparent lid can be used as a drinking cup, a top compass can also be of great use when traveling. Size: 6.69 x 3.14 x 1.96 inches,comes with detailed Instruction Manual, Tubing, Hose Clip, Advanced Filtering System, Carry Bag.
- MAKE SAFE DRINKING WATER from virtually any freshwater source globally. Ultimate performance, portability, and convenience. Ideal for backpacking, hiking, outdoor recreation, and global travel.
- FAST & EASY TO USE: Fill. Press. Drink! - ‘Fill’ from any sketchy freshwater source; ‘Press’ on a low surface (e.g. ground), then ‘Drink’ clean, safe water anywhere
- REMOVES WATERBORNE PATHOGENS: 99.9% of viruses (e.g. rotavirus, norovirus, hepatitis A), 99.9999% of bacteria (e.g. E. Coli, salmonella, dysentery), and 99.9% of protozoan cysts (e.g. giardia, cryptosporidium, amoebae)
- FILTERS out particulates (including microplastics), many chemicals and heavy metals; Improves water taste, smell, and clarity
How To Assemble A Water Bottle Survival Kit: Step By Step Guide
No matter where you go in nature, water can usually be found almost instantly if you know where to look for it. Unfortunately, even with your bottle in tow, it might not always be safe enough for drinking – that is why having a survival kit in your backpack or your purse will come in handy when venturing outdoors.
Your water bottle survival kit must consist of the following:
- A water filter will remove bacteria and contaminants from water, making it safe to drink.
- A water purifier will filter out viruses from water, making it safe to drink.
- A water bottle. Carrying around an extra water source at all times will allow you to be ready when needed without leaving anything un-hydrated behind.
- A straw allows easier drinking from water bottles without needing to open and close their lid, saving time and energy.
- Carabiners effectively attach water bottles directly to backpacks or clothing for easy reach and keeping them within easy reach.
With these items in your water bottle survival kit, you will be ready for whatever the wild throws your way.
How To Prevent Dehydration While On Outdoor?
Campers camping in remote regions often face limited water sources, and enough must be consumed to prevent dehydration; there may even be ways of conserving this resource.
- Stay away from alcohol, caffeine and salt before and during your trip into the backcountry, as these substances could leave you thirstier than usual.
- Be sure to carry enough water. How much you require depends on the climate, activity level and sweat rate.
- Walk during shaded or cooler parts of the day to minimize direct sun.
- Hydrate beforehand by drinking 7-20 ounces of water about two hours before hitting the trail.
- Excessive sweating can dehydrate you quickly; you must consume sufficient fluids throughout your exercise to stay hydrated.
Conclusion
Humans can live for weeks without food, yet only days without water. Since we lose water through sweat, urine and respiration daily, replenishing it with new supplies should become part of daily routine. There are various techniques for finding and purifying water sources in nature – it is wise to be knowledgeable of at least several in case an emergency situation arises.
There are various approaches to purifying water, and choosing one depends on your available resources and goals. Boiling may be one way of purifying it by killing bacteria or parasites present, while chemicals like bleach or iodine tablets could also work well as purification tools. Finally, UV purifiers offer another effective option to purify your drinking water supply.